Horror color palettes and grading for animated Shorts (hex codes and code)
Dark is not the same as scary. A horror palette is a small set of colours with jobs: what feels safe, what is wrong, and how much of the frame the dark is allowed to take.
By Homingo Learn ·
Most horror palettes on the web are mood boards: five dark swatches and an adjective. They look right in a grid and go muddy in a video, because nothing says which colour goes where. This guide treats a palette as a set of roles, gives five palettes with hex codes, shows how to check them in grey, and grades the finished frame in Remotion or with ffmpeg.
Give every colour a job
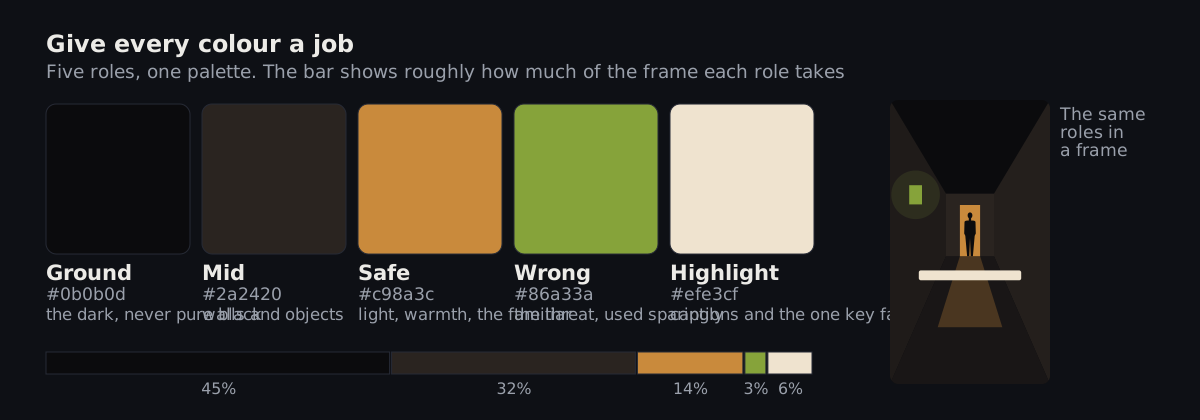
- Ground is the darkest colour: shadows and the dark itself. Lift it a little above pure black and tint it, so compression does not turn it into blocks.
- Mid is the room: walls, furniture, the far parts of the frame. It sits one clear step above ground.
- Safe is the light the characters trust: a lamp, a kitchen, daylight through a window. Usually warm.
- Wrong is the threat colour. It appears only where something is off: a light that should not be on, a reflection, a door that is the wrong colour. Use it on a small area.
- Highlight is for captions and the one face that matters. Nothing else gets this bright.
If the wrong colour covers more than a few percent of the frame, it stops being a warning and becomes the room. Keep it small until the reveal.
Five horror palettes with hex codes
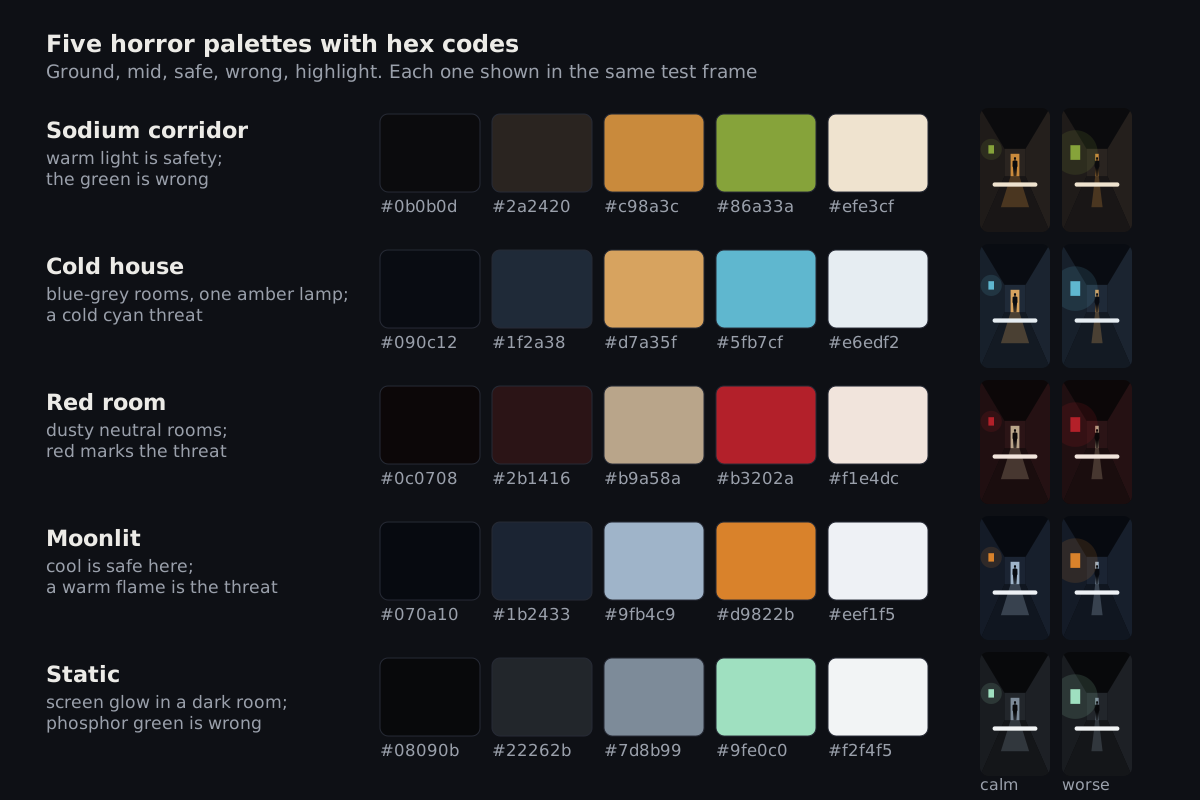
- Sodium corridor:
#0b0b0d#2a2420#c98a3c#86a33a#efe3cf. Warm orange light is safety; the sickly green is wrong. Hotels, car parks, night shifts. - Cold house:
#090c12#1f2a38#d7a35f#5fb7cf#e6edf2. Blue-grey rooms, one amber lamp, and a cold cyan that does not belong. Homes at night. - Red room:
#0c0708#2b1416#b9a58a#b3202a#f1e4dc. Dusty neutrals until the red arrives. Strong, so keep the red rare. - Moonlit:
#070a10#1b2433#9fb4c9#d9822b#eef1f5. Cool moonlight is the safe light here, so a warm flame becomes the threat. Forests, fields, outdoor stories. - Static:
#08090b#22262b#7d8b99#9fe0c0#f2f4f5. A dark room lit by a screen; the phosphor green is wrong. Tech horror, found footage, late-night calls.
Notice the Moonlit palette flips the usual temperatures. What matters is not warm against cold but familiar against wrong: choose whichever temperature your story treats as safe, and give the threat the other one.
Check the values, not the hues
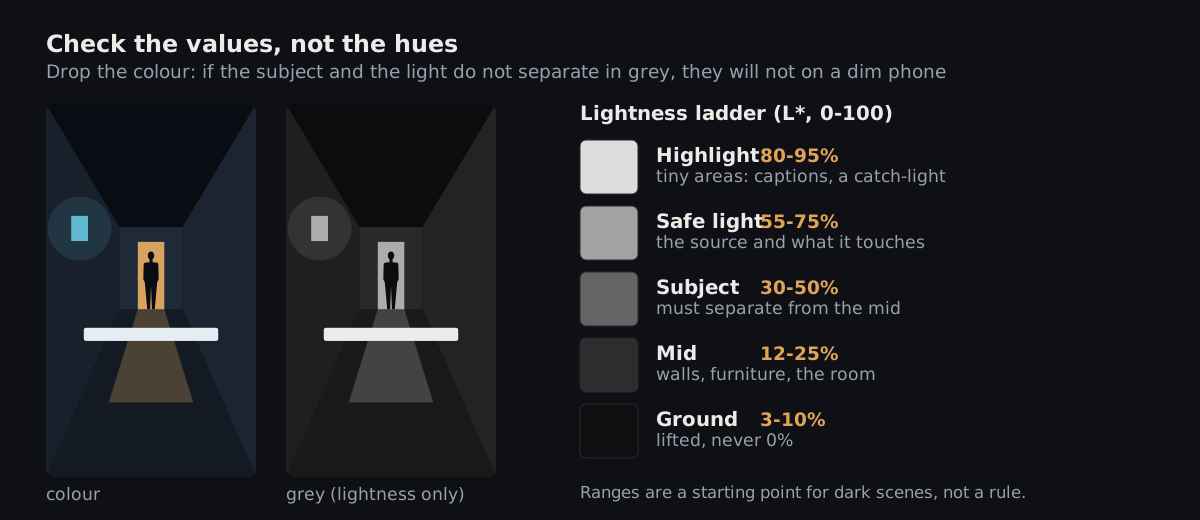
Phones are watched in bright rooms at low brightness, so a dark frame loses its middle values first. Check every palette in grey (lightness only) before you use it. The ladder in the figure is a starting point for dark scenes: ground around 3-10% lightness, the room 12-25%, the subject 30-50%, the light source 55-75%, and highlights above 80% on small areas only. The steps between ground, mid and subject matter more than the exact numbers: if two of them are within a few percent, they merge.
Shift the balance as the story gets worse
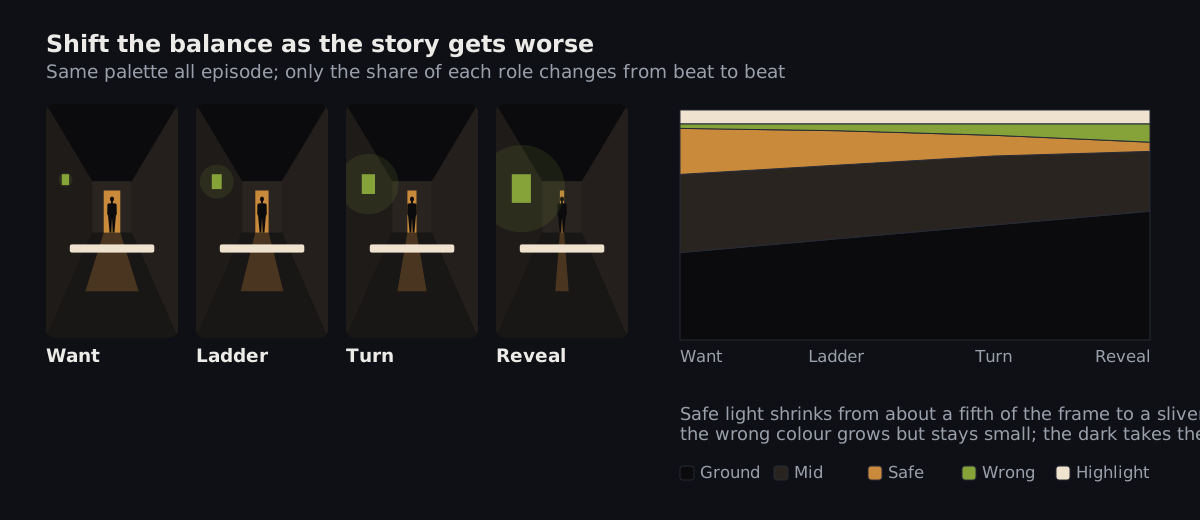
Do not change palettes when things go wrong. Keep the same five colours and change how much of the frame each one gets. In the opening beats the safe light is a fifth of the frame. Through the ladder it shrinks, the wrong colour grows (still small), and the dark takes the rest. At the reveal the safe light is a sliver. The viewer feels the episode getting darker without being able to say why.
Build a palette in code from three hues
Picking lightness by eye is where palettes go wrong, so build them in OKLCH, a colour space where the L value tracks how light a colour looks. You choose three hues (the room, the safe light and the threat) and the code fixes the lightness and colourfulness of each role. Then check caption contrast with the WCAG formula.
export type Role = 'ground' | 'mid' | 'safe' | 'wrong' | 'highlight';

export function horrorPalette(h: { room: number; safe: number; wrong: number }): Record<Role, string> {
  return {
    ground: oklchToHex(0.17, 0.012, h.room),
    mid: oklchToHex(0.28, 0.03, h.room),
    safe: oklchToHex(0.72, 0.11, h.safe),
    wrong: oklchToHex(0.68, 0.14, h.wrong),
    highlight: oklchToHex(0.94, 0.02, h.safe),
  };
}

// horrorPalette({ room: 250, safe: 70, wrong: 130 })
// -> ground #0b1015, mid #1d2a37, safe #d19853, wrong #7ba944, highlight #f4e9dd

export function oklchToHex(L: number, C: number, hue: number): string {
  const a = C * Math.cos((hue * Math.PI) / 180);
  const b = C * Math.sin((hue * Math.PI) / 180);
  const l = (L + 0.3963377774 * a + 0.2158037573 * b) ** 3;
  const m = (L - 0.1055613458 * a - 0.0638541728 * b) ** 3;
  const s = (L - 0.0894841775 * a - 1.291485548 * b) ** 3;
  const linear = [
    4.0767416621 * l - 3.3077115913 * m + 0.2309699292 * s,
    -1.2684380046 * l + 2.6097574011 * m - 0.3413193965 * s,
    -0.0041960863 * l - 0.7034186147 * m + 1.707614701 * s,
  ];
  return '#' + linear.map((v) => {
    const c = Math.min(1, Math.max(0, v));
    const srgb = c <= 0.0031308 ? 12.92 * c : 1.055 * c ** (1 / 2.4) - 0.055;
    return Math.round(srgb * 255).toString(16).padStart(2, '0');
  }).join('');
}

/** WCAG contrast ratio between two hex colours (4.5 or more for captions). */
export function contrast(fg: string, bg: string): number {
  const lum = (hex: string) => {
    const [r, g, b] = [1, 3, 5]
      .map((i) => parseInt(hex.slice(i, i + 2), 16) / 255)
      .map((c) => (c <= 0.04045 ? c / 12.92 : ((c + 0.055) / 1.055) ** 2.4));
    return 0.2126 * r + 0.7152 * g + 0.0722 * b;
  };
  const [hi, lo] = [lum(fg), lum(bg)].sort((x, y) => y - x);
  return (hi + 0.05) / (lo + 0.05);
}
palette.ts: five roles from three hues. Chroma stays modest so the colours fit in sRGB; out-of-range channels are clamped.
With the example palette, the highlight on ground gives about 16:1 and on mid about 12:1, both easy. On the safe colour it is only about 2:1, so a caption over the lamp light fails. Keep captions over the dark parts of the frame, or put a dark plate behind them.
A palette builder like this one is part of the camera, light and grade system in our animated horror reels skill.
Grade the whole frame in Remotion
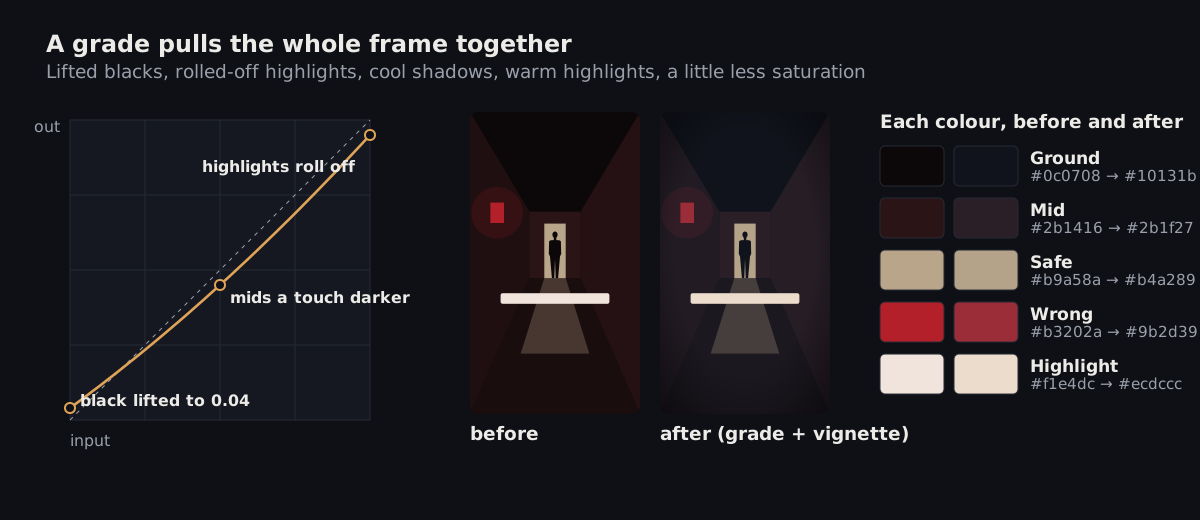
A grade is the last layer: it pulls every shot towards one look, so episodes made weeks apart still belong together. In Remotion you can grade with a wrapper component. Two blend-mode tricks do most of the work. lighten with a dark tinted colour raises every channel darker than the tint up to it, which lifts and tints the blacks in one step. multiply with a pale warm colour barely changes the darks and warms the lights.
import { AbsoluteFill, useCurrentFrame } from 'remotion';

export const Grade: React.FC<{ children: React.ReactNode }> = ({ children }) => {
  const frame = useCurrentFrame();
  return (
    <AbsoluteFill style={{ filter: 'contrast(1.06) saturate(0.85)' }}>
      {children}
      {/* cool, lifted blacks: nothing gets darker than this tint */}
      <AbsoluteFill style={{ background: '#0d121b', mixBlendMode: 'lighten' }} />
      {/* warm highlights: multiply by a pale warm colour */}
      <AbsoluteFill style={{ background: '#fff3e2', mixBlendMode: 'multiply' }} />
      {/* vignette */}
      <AbsoluteFill style={{ background: 'radial-gradient(ellipse at 50% 46%, transparent 55%, rgba(0,0,0,0.55) 100%)' }} />
      {/* fine grain, a new pattern every frame */}
      <AbsoluteFill style={{ mixBlendMode: 'overlay', opacity: 0.1 }}>
        <svg width="100%" height="100%">
          <filter id="grain">
            <feTurbulence type="fractalNoise" baseFrequency="0.9" numOctaves={2} seed={frame % 60} />
          </filter>
          <rect width="100%" height="100%" filter="url(#grain)" />
        </svg>
      </AbsoluteFill>
    </AbsoluteFill>
  );
};
src/Grade.tsx: wrap each episode in the Grade component so every shot gets the same look.
Grain hides banding in dark gradients, but it also makes the file larger and can turn to mush after the platform re-encodes the video. Keep it faint, and compare the uploaded version with your render.
For the composition this grade wraps, see Remotion + Claude Code for 1080x1920 video.
Or grade the render with ffmpeg
If the episode is already rendered, or made in another tool, the same look is one ffmpeg command: curves lifts the black point and rolls off the top, colorbalance pushes shadows cool and highlights warm, eq lowers saturation, then a vignette and temporal grain.
ffmpeg -i out/episode.mp4 \
  -vf "curves=master='0/0.04 0.5/0.45 1/0.95',colorbalance=rs=-0.04:bs=0.06:rh=0.05:bh=-0.04,eq=saturation=0.85,vignette=angle=PI/5,noise=alls=5:allf=t" \
  -c:v libx264 -crf 18 -pix_fmt yuv420p -c:a copy out/episode-graded.mp4

# Compare one frame: left half before, right half after
ffmpeg -ss 5 -i out/episode.mp4 -ss 5 -i out/episode-graded.mp4 \
  -filter_complex "[0:v]crop=iw/2:ih:0:0[l];[1:v]crop=iw/2:ih:iw/2:0[r];[l][r]hstack" \
  -frames:v 1 compare.png
The audio stream is copied untouched (-c:a copy).
Checklist before you post
- The palette has five roles, and the wrong colour covers only a small area until the reveal.
- In grey, ground, mid, subject and light are four clearly different steps.
- The darkest areas are lifted a little above pure black and tinted, not crushed to zero.
- Captions reach at least 4.5:1 against what is behind them, checked on the brightest frame they cover.
- The safe light shrinks from beat to beat; the palette itself does not change mid-episode.
- The graded upload looks like your render on a phone at low brightness.
Next: put these colours into shots with horror camera angles and lighting for animated Shorts, or plan the story first with the 60-second horror script template.