Exploded view animation in code: make "how it works" explainer reels
Take a machine apart on screen, one part at a time, while a voice names each piece. The motion is a few small functions; the craft is in the order, the timing and the cuts.
By Homingo Learn ·
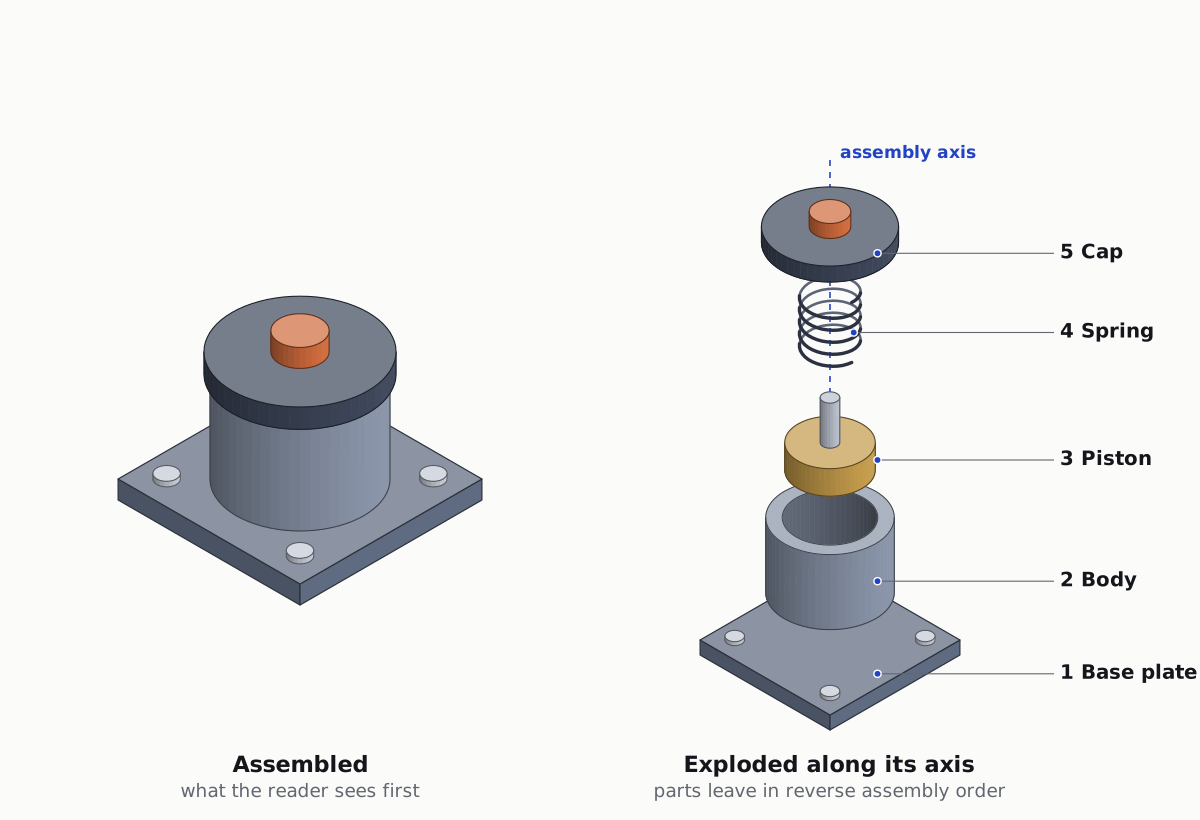
Exploded views are how manuals, engineering channels and product pages explain a machine: the parts pull apart along the line they were assembled on, so the viewer sees what is inside and how it fits together. CAD and 3D tools (SolidWorks, Fusion, KeyShot, Blender) make them from a 3D model. For a docs figure or a short explainer you often have no model, and an isometric drawing generated by code is faster to change and easy to time to a voice-over. This guide builds one, step by step, and renders it as a vertical reel.
Pick the assembly axis and the order
- One axis per part: the direction the part would slide out if you took the machine apart. In a stacked part like this valve it is the same vertical axis for every part; a side cover would slide along x or y.
- Reverse assembly order: the last part on is the first part off. The cap leaves first, the base plate never moves.
- Even gaps: the space between neighbours should be about the same, so the eye reads them as one ordered stack rather than parts floating at random.
- Nothing passes through anything: a part that has to leave through another one (a piston inside a body) waits until the way is clear, or leaves along a different axis.
The explode function: offsets with a stagger
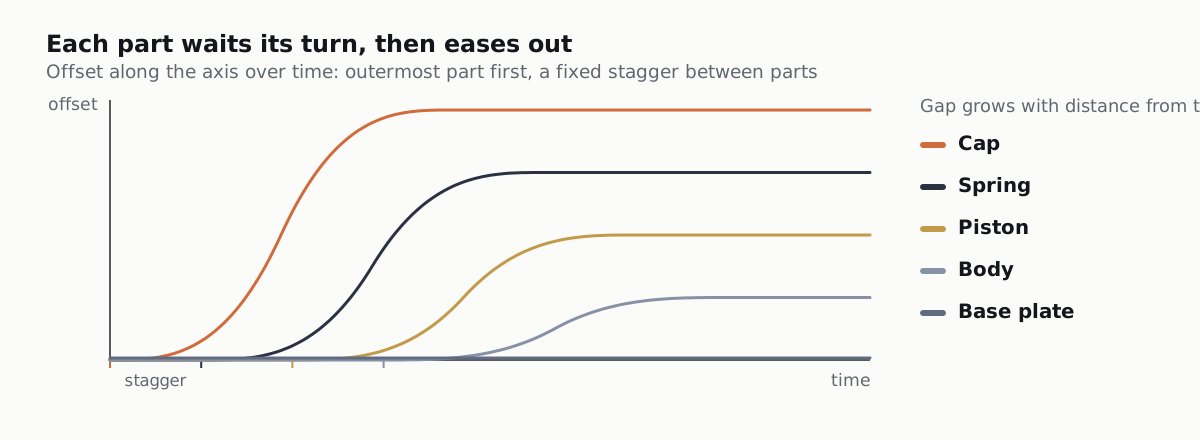
Each part gets a lift: how far it travels when the view is fully exploded. One progress value from 0 to 1 then drives all of them, with a delay per part so they leave one after another. Ease in and out, so nothing starts or stops with a jolt.
const clamp01 = (v) => Math.min(1, Math.max(0, v));
export const ease = (t) => (t < 0.5 ? 4 * t * t * t : 1 - (-2 * t + 2) ** 3 / 2);

// Assembly order, bottom first. lift = distance travelled when fully exploded.
export const PARTS = [
  { id: 'base', lift: 0 },
  { id: 'body', lift: 0.95 },
  { id: 'piston', lift: 1.9 },
  { id: 'spring', lift: 2.85 },
  { id: 'cap', lift: 3.8 },
];

export function offsets(t, stagger = 0.12, span = 0.45) {
  return PARTS.map((p, i) => {
    const order = PARTS.length - 1 - i; // the cap leaves first
    const local = clamp01((t - order * stagger) / span);
    return { id: p.id, dz: p.lift * ease(local) };
  });
}
explode.mjs: offsets along the axis, in world units, for a progress t from 0 (assembled) to 1 (exploded).
Check the numbers fit: the last part starts at 4 × 0.12 = 0.48 and needs 0.45 to finish, so everything is done by t = 0.93. Draw the parts from the bottom of the stack to the top, each at its assembled height plus dz, and the higher parts correctly cover the lower ones. For a part that sits inside another, draw the outer part in two halves: its back half, then the inner part, then its front half. The inner part then appears to rise out of the opening instead of floating in front of it.
Cutaways: show the inside without losing the outside
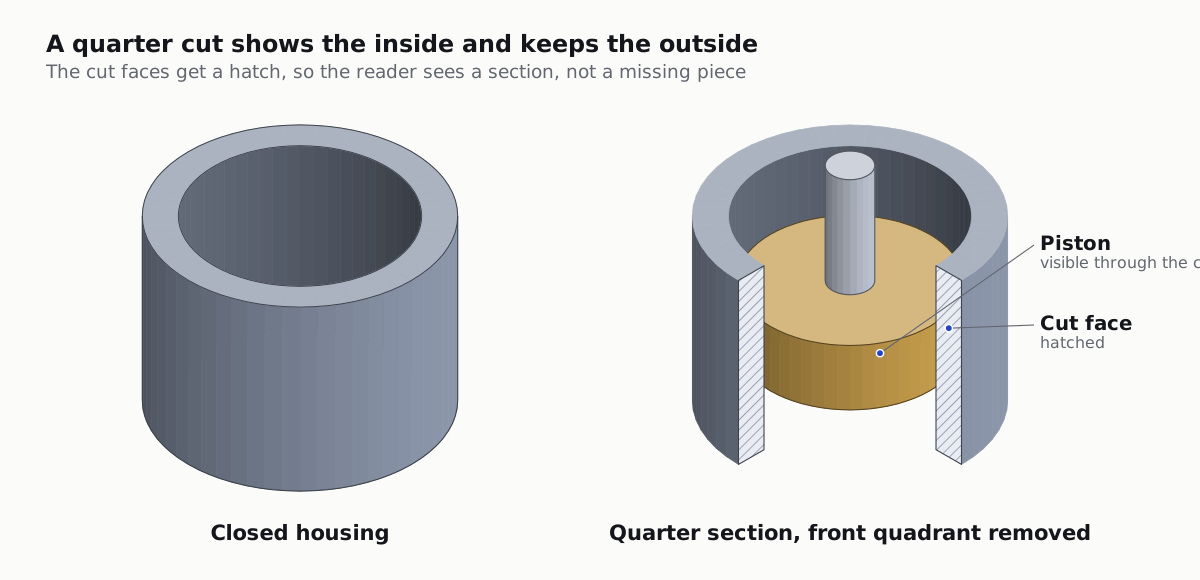
An exploded view shows how parts fit; a cutaway shows how they sit when assembled. The classic cut removes the quarter of the housing that faces the viewer. In an isometric view that is the quarter between world angles 0 and 90 degrees, centred on the line pointing at the camera. Draw the tube as thin vertical strips, skip the strips inside the cut, and add the two cut faces with a hatch so the reader sees a section, not a missing piece.
const at = (cx, cy, rr, a, z) => [cx + rr * Math.cos(a), cy + rr * Math.sin(a), z];

export function cutTube(cx, cy, z, r, ri, h, base, cut = [0, 90]) {
  const strips = [];
  for (let i = 0; i < 72; i++) {
    const a0 = (i * 5 * Math.PI) / 180, a1 = ((i + 1) * 5 * Math.PI) / 180;
    const mid = i * 5 + 2.5;
    if (mid > cut[0] && mid < cut[1]) continue;
    const facing = Math.cos((mid * Math.PI) / 180) + Math.sin((mid * Math.PI) / 180); // > 0: faces the viewer
    const rr = facing > 0 ? r : ri; // far side: we see the inner wall through the cut
    const fill = facing > 0 ? tone(base, -0.3 * Math.max(0, Math.sin(a0))) : tone(base, -0.45);
    const quad = [at(cx, cy, rr, a0, z), at(cx, cy, rr, a1, z), at(cx, cy, rr, a1, z + h), at(cx, cy, rr, a0, z + h)];
    strips.push([facing > 0 ? facing : facing - 3, `<polygon points="${pts(quad)}" fill="${fill}" stroke="${fill}"/>`]);
  }
  const face = (deg) => {
    const a = (deg * Math.PI) / 180;
    const quad = [at(cx, cy, ri, a, z), at(cx, cy, r, a, z), at(cx, cy, r, a, z + h), at(cx, cy, ri, a, z + h)];
    return [9, `<polygon points="${pts(quad)}" fill="url(#hatch)" stroke="${tone(base, -0.55)}"/>`];
  };
  strips.push(face(cut[0]), face(cut[1]));
  // Back to front: inner walls first, then the outer wall, then the cut faces.
  return strips.sort((p, q) => p[0] - q[0]).map((p) => p[1]).join('');
}

export const HATCH = `<pattern id="hatch" width="7" height="7" patternUnits="userSpaceOnUse" patternTransform="rotate(45)">
  <rect width="7" height="7" fill="#e9ecf2"/><line x1="0" y1="0" x2="0" y2="7" stroke="#9aa3b5" stroke-width="2"/></pattern>`;
cutaway.mjs: a tube (outer radius r, inner radius ri) with an angle range removed. Uses iso(), pts() and tone() from the architecture guide.
Draw what is inside (the piston) after the inner walls and before the outer wall and the cut faces; with the sort keys above that means inserting it between the two groups. To animate the cut, open it from the front line outwards: cut = [45 - 45 * k, 45 + 45 * k] with k eased from 0 to 1. The section then opens like a door towards the viewer.
Callouts: anchor to the part, not the screen
A label that stays put while its part moves away is worse than no label. Anchor each callout to a point on the part in world coordinates, project it every frame, and draw a leader line from there to the label. Fade the label in when the narration names the part, and keep the text itself flat to the screen.
export function callout([wx, wy, wz], text, opacity, side = 1) {
  const [ax, ay] = iso(wx, wy, wz);
  const lx = ax + side * 150, ly = ay - 36;
  const anchor = side > 0 ? 'start' : 'end';
  return `<g opacity="${opacity.toFixed(3)}">
    <path d="M ${ax.toFixed(1)} ${ay.toFixed(1)} L ${(lx - side * 14).toFixed(1)} ${ly.toFixed(1)} H ${lx.toFixed(1)}" fill="none" stroke="#62666f" stroke-width="1.5"/>
    <circle cx="${ax.toFixed(1)}" cy="${ay.toFixed(1)}" r="4" fill="#2343c4" stroke="#fff" stroke-width="1.5"/>
    <text x="${(lx + side * 8).toFixed(1)}" y="${(ly + 5).toFixed(1)}" text-anchor="${anchor}" font-family="system-ui" font-size="26" font-weight="650" fill="#14161c">${text}</text>
  </g>`;
}

// The cap's callout point rides on its rim: callout([1.12, 0, capZ + dz + 0.16], 'Cap', fadeIn)
callout.mjs: a leader line and a label that follow a moving part. side is 1 (label to the right) or -1.
Time everything to the narration with named cues
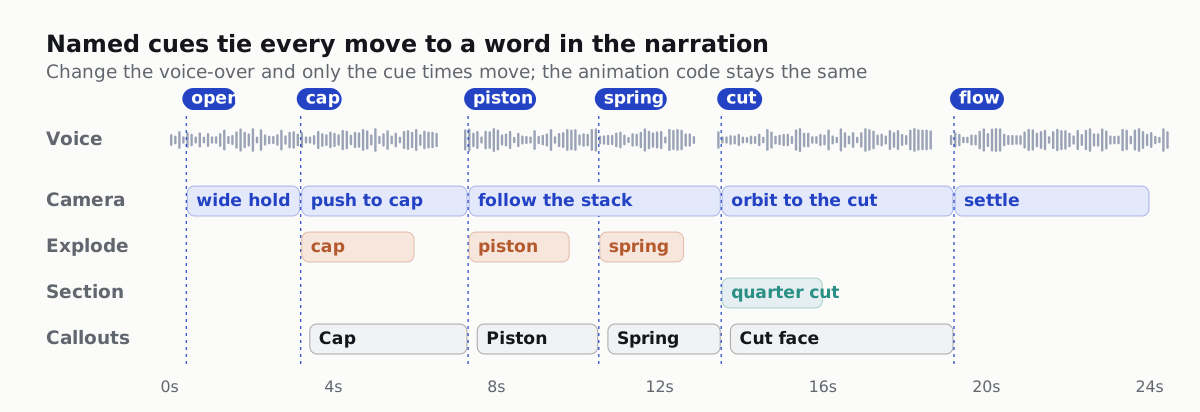
Write the script with a named marker where each thing should happen. After recording, find the time of each marker: from a transcription tool that gives word timestamps, or by placing labels in an audio editor while you listen (Audacity can export labels as a text file). Save them as one small JSON file. The animation reads cue names only, so a new take of the voice means a new cue file and no code changes.
[[open]] This is a spring valve, the kind that holds pressure until it should not.
[[cap]] The cap comes off first.
[[piston]] Under it sits the piston,
[[spring]] and the spring that pushes it back down.
[[cut]] Cut the body open and you can see the piston fill the bore.
[[flow]] When pressure wins, the piston lifts and the flow gets through.

{ "open": 0.4, "cap": 3.2, "piston": 7.3, "spring": 10.5, "cut": 13.5, "flow": 19.2 }
script.txt and cues.json (seconds).
import CUES from './cues.json' with { type: 'json' };
import { ease } from './explode.mjs';

export const FPS = 30;
const clamp01 = (v) => Math.min(1, Math.max(0, v));
export const cueFrame = (name) => Math.round(CUES[name] * FPS);

// 0 before the cue, 1 once `frames` frames have passed, eased in between.
export const after = (frame, name, frames = 18) => ease(clamp01((frame - cueFrame(name)) / frames));

// In a narrated reel each part leaves on its own cue instead of a fixed stagger:
// capDz = 3.8 * after(frame, 'cap', 24); pistonDz = 1.9 * after(frame, 'piston', 24); ...
// fade a callout in over 8 frames: callout(point, 'Piston', after(frame, 'piston', 8))
cues.mjs: progress values that start at a named cue.
The same narration-first timing, applied to one concept per video: a five-beat explainer storyboard (in Hinglish).
From a wide figure to a vertical reel
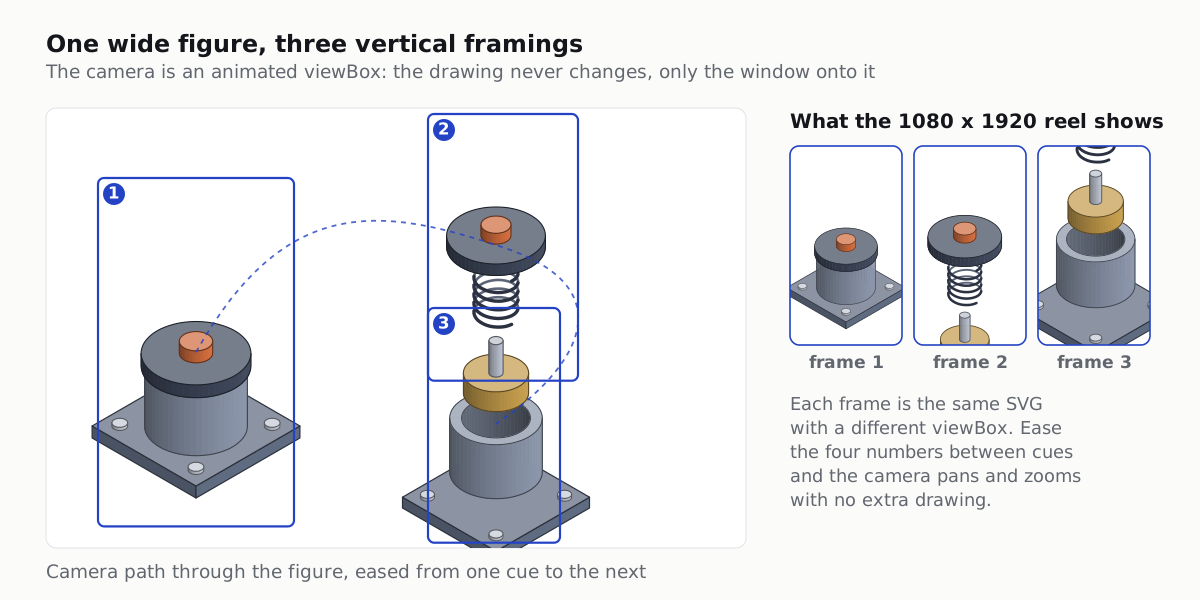
You do not need a second drawing for the reel. Keep the drawing in its own coordinates and animate the viewBox: x, y and width of a 9:16 window onto it. Moving the window pans, shrinking it zooms in. Set one window per cue and ease between them.
import { after, cueFrame } from './cues.mjs';

const SHOTS = [
  { at: 'open', x: 52, y: 70, w: 196 },
  { at: 'cap', x: 382, y: 6, w: 150 },
  { at: 'piston', x: 382, y: 200, w: 132 },
];

export function viewBox(frame) {
  const i = Math.max(0, SHOTS.findLastIndex((s) => frame >= cueFrame(s.at)));
  const from = SHOTS[Math.max(0, i - 1)], to = SHOTS[i];
  const k = i === 0 ? 1 : after(frame, to.at, 20);
  const mix = (a, b) => a + (b - a) * k;
  const w = mix(from.w, to.w);
  return { x: mix(from.x, to.x), y: mix(from.y, to.y), w, h: (w * 16) / 9 };
}
camera.mjs: the viewBox for any frame. Height always follows from 9:16.
One side effect: zooming the viewBox also scales strokes and text. Draw the callouts in a second layer that is not zoomed, and place them by converting each anchor to output pixels: px = (x - vb.x) × 1080 / vb.w, and the same for y. Lines stay crisp and labels stay the same size whatever the zoom. Keep the named part and its label inside the middle band of the frame, roughly 25% to 65% from the top; our safe zone guide has the exact boxes.
Our Isometric explainers skill does this step with one command: the figure becomes a 1080x1920 reel with camera moves, cutaways and callouts timed to the narration.
Render the frames and encode the reel
Each frame is a pure function of the frame number: compute the offsets, the cut and the viewBox, build the SVG string, rasterise it. @resvg/resvg-js turns SVG into PNG in Node without a browser; ffmpeg joins the frames and the narration.
import { mkdirSync, writeFileSync } from 'node:fs';
import { Resvg } from '@resvg/resvg-js';
import { frameSvg, TOTAL_FRAMES } from './reel.mjs';

mkdirSync('frames', { recursive: true });
for (let f = 0; f < TOTAL_FRAMES; f++) {
  const png = new Resvg(frameSvg(f), {
    fitTo: { mode: 'width', value: 1080 },
    font: { loadSystemFonts: true },
  }).render().asPng();
  writeFileSync(`frames/${String(f).padStart(5, '0')}.png`, png);
}
render.mjs: writes frames/00000.png onwards. frameSvg(f) builds the full 1080x1920 SVG for frame f.
ffmpeg -framerate 30 -i frames/%05d.png -i voice.wav \
  -c:v libx264 -pix_fmt yuv420p -crf 18 -c:a aac -b:a 192k -shortest reel.mp4

ffprobe -v error -select_streams v:0 -show_entries stream=width,height,r_frame_rate -of csv=p=0 reel.mp4
ffmpeg -i reel.mp4 -vf "freezedetect=n=0.001:d=2" -map 0:v -f null - 2>&1 | grep freeze_start
Encode, then check size, frame rate and frozen stretches longer than 2 seconds.
If grep prints nothing, no stretch is frozen for two seconds or more. A long held wide shot is the usual culprit: give it a slow drift of the viewBox.
Checks before you post
- No part passes through another while it moves; inner parts rise out of their openings.
- Every part is on screen, and clearly visible, at the moment the voice names it.
- Callouts follow their parts and fade in on the cue, never before it.
- Labels and the named part sit inside the middle band of the 9:16 frame.
- The file is 1080x1920 at 30 fps, has an audio stream, and has no frozen stretch over two seconds.
Next: draw a whole system the same way with isometric architecture diagrams as code, or start from a single docs figure in isometric SVG diagrams for technical docs.